Recipe: Kenny Lao and Genevieve Ko's Thai Green Curry Dumplings
Don’t let the silly illustrations and goofy photos fool you. Kenny Lao and Genevieve Ko’s Hey There, Dumpling!: 100 Recipes for Dumplings, Buns, Noodles, and Other Asian Treats is a seriously good cookbook. Among some cute asides and cringe-worthy exclamations (Peking duck dumplings: “We’re bringing sexy quack with this one!”) are satisfying recipes and helpful tips for amateurs.
I didn’t choose Hey There, Dumpling! to make a noodle dish. After trolling for that interesting-but-not-painful recipe sweet spot, I settled on Thai Green Curry Dumplings, which called for some ingredients that are atypical in my kitchen but not enough to make it cost prohibitive or hard to find what I needed in town. Lao recommends Twin Marquis dumpling wrappers, which I found at Jay’s International Food Co. on South Grand. Their toothsome texture and flavor make using wonton wrappers for dumplings a thing of the past.
The recipe was simple, clear and made for some complex layers of flavor in a cute little package. The only moment of confusion came when trying to decipher the folding instructions, which had less than helpful illustrations. Falling back on some previous pierogi experience, I created my own dumpling shape, which worked fine. More important, they tasted great – fresh and zingy with a hint of heat. Before this, I’d never made an Asian recipe I’d be happy to be served in a restaurant.
Skill level: Easy to intermediate. The dumplings are more labor intensive than difficult, and the book offers clear instructions and helpful tips.
This book is for: Dumpling lovers, obvi.
Other recipes to try: Classic pork and Chinese chive dumplings, mushroom dumplings, Szechuan chicken dumplings
The verdict: As much as it pains me to say it, Talde’s pretzel dumplings won the day. The Thai green curry flavors were amazing, but nothing beats a salty, fried nugget of pork fat dipped in mustard.
Thai Green Curry Dumplings
45 dumplings
1 lb. (455 g.) Napa cabbage, cored and finely chopped
2¼ tsp. kosher salt
1 lb. (455 g.) fatty (80/20) ground pork
1 Tbsp. minced fresh lemongrass
1 Tbsp. minced peeled fresh galangal or ginger
1 Tbsp. minced shallot
1½ tsp. coriander seeds, toasted and ground
1 tsp. freshly grated lime zest
1 tsp. minced fresh green Thai chile
½ tsp. freshly ground black pepper
1 1-lb. (455 g.) package round dumpling wrappers
Dr. Tan’s Chile Dip (optional)
• In a fine-mesh colander, mix the cabbage and 2 teaspoons salt. Let stand while you get everything else ready, at least 10 minutes. Grab handfuls of the cabbage and squeeze as hard as you can to get rid of all the liquid.
• Transfer the dried cabbage to a large bowl and add the pork, lemongrass, galangal or ginger, shallot, coriander, lime zest, chile, pepper, and remaining ¼ teaspoon salt. Use your hands to work all the ingredients together until well-mixed. It’s best to use your hands because you can get everything incorporated into the meat without making the pieces of meat too small.
• If you have time, cover and refrigerate the filling until nice and cold, up to 2 days. The filling will be easier to spoon into your wrappers when it’s chilled.
• When you’re ready to cook, follow the wrapping and frying instructions.
• Serve the dumplings with Dr. Tan’s Chile Dip, if desired.
Prep the Deck
• Get a foot or so of a work surface nice and clean. Your kitchen counter works fine. A big cutting board does, too.
• Have a flat plate or rimmed pan lined with waxed paper or parchment paper ready. This is where you’re going to put your finished dumplings. If you’re planning on freezing the dumplings right away, use a rimmed pan, but be sure to use on that fits in you freezer. (I’ve totally zonked on that before and used a pan bigger than my freezer.)
• You need a pack of round flour dumpling wrappers, sometimes labeled potsticker or gyoza wrappers. You can buy them in regular supermarkets nowadays. If you can’t find them there, they’ll definitely be at your nearest Asian grocery. They should be 4 to 5 inches (10 to 12 cm) in diameter, thin enough to flap around, and whitish. (The yellow ones are for wontons and have egg in the dough; don’t use those.) Each pack should have 40 to 50 wrappers, the number you’ll need for my filling recipes. (I especially like the Twin Marquis brand, but have also used TMI Shanghai-Style wrappers with success.) Wrappers are easiest to fold and seal when they’re at room temperature, so take them out of the fridge first. If you bought them frozen, throw them in the fridge overnight or just set them on the counter until they’re room temp. It doesn’t take too long – like 30 minutes or so. And have a damp kitchen towel handy so you can keep the wrappers moist while you’re wrapping. If they dry out, they’ll crack while you’re rolling.
• Set out a bowl of water next to the wrappers. You’ll use this to seal the dumplings. I know some people who mix beaten egg or egg white with water, but I like to keep it simple. And water works.
• Finally, your filling. You’ll want a bowl of it all mixed up and ready to go. Set this bowl after your wrappers and bowl of water and before your pan. It’s easiest to work with cold filling, so if you can, make it ahead of time and refrigerate it until you’re ready to start wrapping. Have a spoon, measuring tablespoon, butter knife, small offset spatula, or a pair of chopsticks ready for scooping the filling.
It’s a Wrap
• Open the wrapper packet, take out five, and cover the rest with a damp towel.
• Lay out the wrappers like ducks in a row.
• Dip your finger in the water and wet ½ inch (12 mm.) of the rim of each wrapper. You want it moister than a licked envelope, but not actually wet. The water will get the wrapper to stick to itself later, but too wet and it’ll make the wrapper soggy and unfoldable.
• Scoop a fat tablespoon (basically a level tablespoon) of filling into the center of each wrapper. You can sorta eyeball it once you measure out one. The more filling you use, the harder it is to wrap, but the more satisfying the dumpling is. If you’re new at this, start with a little less filling, I like to scoop the filling with a regular spoon and push it off so that it ends up in a tiny football shape. It’s easier to fold the wrapping around this than a golf ball shape.
Crescent Moon Fold
• Fold down the centerline of the wrapper along the long axis of the football-shaped filling glob/dollop.
• Keep sealing the edges of the wrapper, moving out from the center, until they’re sealed to the ends.
• Gently curve the dumpling into a crescent shape by pulling the ends toward each other.
• Make sure the edges are really stuck together.
Fry, Fry Again
• First, get the right pan. Choose a nonstick skillet with a lid you can pick up easily with one hand because you’re gonna need to flip it later. So well-seasoned cast-iron is great if you’re jacked.
• Coat the bottom of the pan with oil. I like using canola oil or another neutral oil. For a 12-inch (30.5-cm.) pan, that’s about 2 tablespoons. The oil will pool in a nonstick pan, but will spread out later.
• Start arranging the dumplings belly-to-belly in supertight concentric circles in a rosette shape. You should have one outer ring, one inner ring, and a few in the middle.
• Add 3 tablespoons water to the pan, set over medium heat, and cover. By starting with a cold pan, you’re not under any pressure to arrange those dumplings quickly. And you don’t have to deal with the whole cold-water/hot-oil scary splatter.
• Just let them cook now, rotating the pan every once in a while if you know your stove’s heat is uneven. Because there’s hot oil and water mixed in there, you want to keep the lid on tight to avoid getting burned. Don’t be scared of the popping you hear. That sound means the bottoms are getting nice and fried while the fillings and tops steam.
• What you’re waiting for is the water to evaporate. When it does, the sound under the lid will change from bubbly pops to a pretty serious steady crackle. Lift the lid away from your face and peek to see if the pan’s dry. If it is, take off the lid. If not, cover again. This step takes about 7 minutes with fresh dumplings and about 10 minutes with frozen ones. If you worried about whether they’re cooked through, you can use a meat thermometer to take the temp of one (the USDA says 165 degrees is what you need for meat) or poke one open from the top and peek inside. Try not to cut it all the way and let the juices spill out, though.
• After you’ve uncovered the dumplings, turn off the stove. Jerk the pan a little to give it a good shake and see if the dumplings are stuck or if they slide a little. If they seem stuck, shake the pan a little more to unstick them or slide a spatula under them to separate them from the pan.
• Center a heatproof plate that’s bigger than the pan over the pan. Put on oven mitts to protect your hands. Holding the pan and the plate tightly, flip them both together. Do it fast! Lift off the pan and voila! It’s a beautiful dumpling tarte tatin!
• Right when the dumplings are done, they’ll be really stuck together. I’m totally fine with that and think it’s fun to pry them apart. If you let them sit for 5 minutes or so though, they pull apart much more easily. And, at that point, the fillings aren’t burn-your-mouth hot. If you’ve gotta do a lot of batches to serve them all at the same time, tent the plate loosely with foil and place in a 200 degrees oven. I prefer to invite everyone into the kitchen and let ‘em eat while I keep frying.
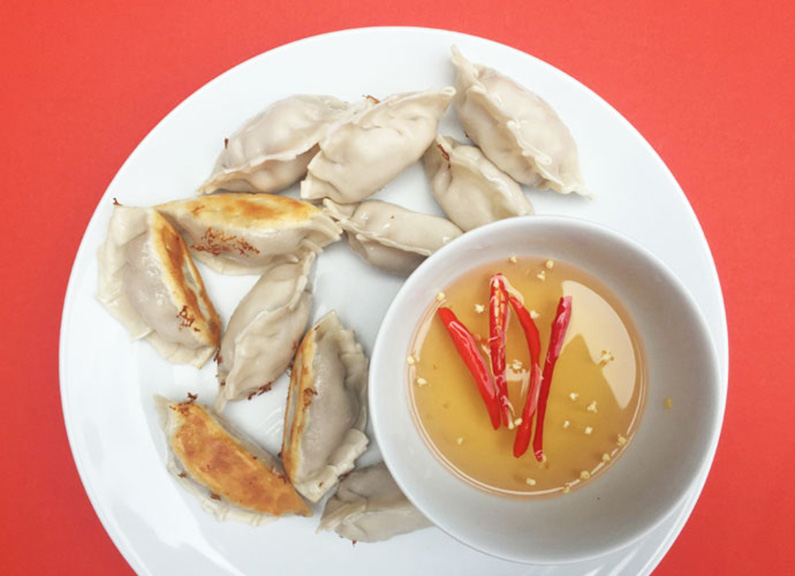
Dr. Tan’s Chile Dip
½ cup (120 ml.)
½ cup (120 ml.) rice wine vinegar
2 Tbsp. sugar
1 Tbsp. fish sauce
2 small fresh Thai chiles, split lengthwise.
• In a small bowl, stir together all of the ingredients. If you have time, cover and refrigerate the mixture overnight. Pick out and discard the chiles before serving. The dip can be refrigerated in an airtight container for up to 2 weeks.
Reprinted with permission from Stewart, Tabori & Chang
Tags : Recipes
Most Recent
3 awesome under-the-radar restaurants inside gas stations around St. Louis
If you ask us, there’s something rather joyous to pushing through the …


