The Butcher's Daughter: Family recipes to remember
White paper, twine and knives. Some of the earliest memories I have of my dad are of white paper and twine and knives. Not the standard perhaps, but as a butcher’s daughter, it was a normal part of life for me.
When I was very young, my dad, Joe Kroupa, worked in a small grocery/meat market. He would come home from work with all kinds of meat – pork chops, steaks, braunschweiger, sausages – beautifully wrapped and perfectly tied. Even after he retired, he continued to trim the meat he bought at home, rewrap it with that white paper, tie it, label it and stack it in the freezer.
He was a butcher – that’s what he knew.
I’d see him in the kitchen, prepping some kind of roast, tenderloin or ham. Trimming, cutting, using his palms and fingers, the knife gliding through, then grabbing his twine to truss or tie, making those perfect little knots. On Thanksgiving, he carved the turkey like a surgeon, making just the right cut. Precise. Deliberate. Every move so effortless. The knife was an extension of his hand, and his skills were incredible.
For many years, he processed deer in our garage for friends during hunting season. It was fascinating to watch, but I didn’t think much about it until many years later. In my first week of culinary school, the chef gave us tasks to assess our skill level. Once, he handed me a beef tenderloin and asked me to get it ready for the oven. Without a second thought, I grabbed a cutting board, my knives and some twine, and I got to work.
I trimmed the chain, the silver skin, tucked the tail and tied it with butchers twine, just as I had seen my dad do for so many years. When the chef came to check my work, he fully expected to see a mangled tenderloin, rather than the one in front of him: perfectly prepped, seasoned and ready for the oven. He asked where I learned to do that. “Easy,” I said. “My dad was a butcher – I guess I paid attention.”
As I went through culinary school, my dad and I talked a bit about what I was doing, but we never cut meat together or really hung out in the kitchen. It wasn’t until a few years ago when I connected with Chris McKenzie of Mac’s Local Eats. He was sourcing meat for a small group that wanted to buy local grass-fed beef or local farm-raised pork. I remember my dad and me driving with McKenzie, coolers in the back, to pick up beef from a processor in Jackson, Missouri. We took a tour of the plant, and I watched my dad talk to the guys. Of course, since he was there, he had them cut meat to his specs. It gave me a view into his world, told me a bit more about who he was.
About a year later, a few chefs and I got together and bought a couple of pigs from a local farmer. “What are you going to do with that now?” my husband asked in a bit of a panic on our way home. I smiled as I grabbed my phone. I told my dad to grab his knives and meet me at my house – I had a little project and needed his help. When he walked in and saw that pig on the kitchen island, his eyes lit up. We spent the whole afternoon breaking it down in my little kitchen. That day, something in our relationship shifted. I think we both realized how alike we were.
After that, we spent more time in the kitchen. We’d get together on a Saturday or Sunday afternoon and make sausage. He would come over with the pork perfectly cut, and we’d play around with spices until the mix was just perfect. I was always on the grinder, and he was right there next to me, working his magic with the casing – getting in just the right amount of filling and making flawless links. Those days helped me realize I had been out of the kitchen too long. I was working in catering and events at the time, and during those moments with my dad, I knew I needed to do something, anything, to get cooking again. It’s what motivated me to take that leap and join Dierbergs Markets as culinary creative director. I think it made him happy to see I was back in the kitchen – teaching, writing recipes and sharing my love of food.
My dad passed away earlier this year, and I am so grateful to have spent that time cooking, talking and learning with him. It got me back in the kitchen, but it also made me realize that as much as I wanted my dad to be proud of me, he wanted me to be proud of who he was, too. I will always be proud to be the butcher’s daughter.

Save your sausage
To keep meat from getting stuck in the grinder…
keep the ingredients and the grinding equipment cold. There’s a lot of fat in sausages, and as it comes to room temperature and melts, it will start to look pink, not red and white. If it gets too warm, return the meat to the freezer to chill, remove the grinder and die, clean and try again.
To test flavor and texture before it’s too late…
try the mix before stuffing the sausage by cooking a small patty in a stainless-steel skillet over medium-low heat until meat is cooked through, about 4 minutes. Let it rest a few minutes, then cut it in half. It should hold together. Taste for seasoning and adjust as needed.
If the casing bursts during filling…
pinch off on both sides of the tear, squeeze out meat in the middle, and tie off the casing. Give yourself 6 inches of slack on the nozzle and start again.

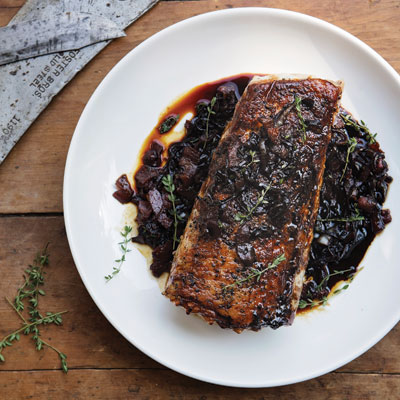
Cider-Glazed Pork Roast
8 servings
This was one of my dad’s favorite Sunday dinners. When I would make it, he would come over and peer into every pot, making sure I was doing it the right way.
2 qt. apple cider
8 oz. bacon, cut into ½-inch pieces
3 lbs. boneless pork loin roast
Kosher salt and freshly ground black pepper, to taste
4 Tbsp. vegetable oil, divided
2 medium onions, thinly sliced
2 tsp. fresh thyme
• In a large saucepan, bring the cider to boil over medium-high heat until it reduces to about 2 cups, 30 to 45 minutes.
• Reduce the heat to medium and simmer until it has the consistency of maple syrup and 1 cup remains, about 45 minutes. Let cool and set aside.
• Preheat the oven to 350 degrees.
• In a Dutch oven over medium heat, saute the bacon until the fat renders and the bacon is lightly browned, 8 to 10 minutes. Use a slotted spoon to remove the bacon and drain on a paper towel-lined plate. Set aside.
• Season the pork roast all over with salt and pepper. Add 2 tablespoons oil to the Dutch oven and raise the heat to medium-high. Add the roast fat side-down and sear, turning until browned on all sides, about 8 minutes.
• Transfer the Dutch oven to the oven and cook uncovered 20 minutes.
• Spoon ½ cup reduced cider over the meat and continue to cook until a thermometer inserted in the thickest part of the roast reaches 140 degrees, about 15 minutes. Transfer the roast to a cutting board, cover loosely with foil and let rest at least 10 minutes.
• Meanwhile, place the Dutch oven over medium heat and add the remaining 2 tablespoons oil. Add the onion and saute until golden-brown, 5 to 8 minutes. Add the bacon and saute until heated through, 3 to 4 minutes. Add the thyme and the remaining ½ cup reduced cider and continue to cook, stirring often until the pan juices have reduced to a glaze, about 4 minutes. Season to taste with salt and pepper.
• To serve, slice the roast and top with the glazed onions. Drizzle with any remaining reduced cider.

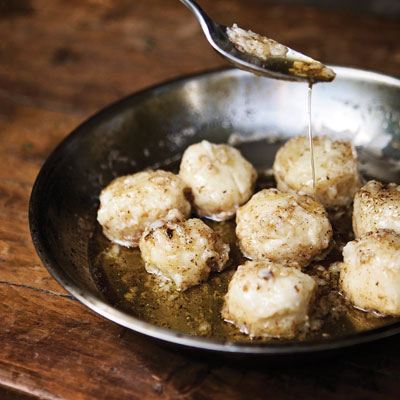
Grandma’s Potato Dumplings
4 to 6 servings
½ lb. (2 sticks) unsalted butter, cut into pieces
4 large russet potatoes, peeled
1 to 1½ cup flour
½ tsp. kosher salt
1 egg, beaten
• Melt the butter in a heavy-bottomed, stainless-steel skillet over medium heat, whisking frequently. The butter will foam, then subside. Continue to whisk as light brown specks form at the bottom of the pan. When the butter is browned and smells nutty, about 3 to 4 minutes, remove from heat and pour into a bowl. Set aside and keep warm.
• Place the potatoes in a large pot of salted water and bring to boil over medium-high heat. Lower the heat to medium and cook until tender, 40 to 45 minutes. Drain and let cool.
• Roughly chop and mash well with a fork or run the potatoes through a ricer. Add 1 cup flour and the salt and knead until a smooth dough forms, adding flour 1 tablespoon at a time if dough is too sticky. Mix in the egg until incorporated.
• Use your hands to form ¼ cup dough into balls a bit larger than a golf ball.
• Bring a large pot of salted water to just below a boil over medium-high heat. Working in batches, add 4 to 5 dumplings to the pot and cook 10 to 15 minutes, until the dumplings rise to the top. Using a slotted spoon, transfer to a serving platter and keep covered with a damp towel. Repeat with the remaining dumplings.
• To serve, pour the brown butter over the dumplings.
Sweet and Sour Red Cabbage
10 to 12 servings
8 oz. bacon, chopped
2 heads red cabbage, shredded
2 small Granny Smith apples, peeled, cored and chopped
1 medium onion, chopped
²∕³ cup sugar
²∕³ cup apple cider vinegar
2 Tbsp. lemon juice
1 tsp. caraway seed
½ tsp. ground ginger
¼ tsp. allspice
¼ tsp. cloves
1∕8 tsp. cinnamon
Kosher salt and freshly ground black pepper, to taste
• In a very large skillet over medium-high heat, saute the bacon until browned and crisp, 8 to 10 minutes. Add the cabbage and saute until just softened, about 8 minutes. Add the apples, onion and sugar and cook 5 minutes, stirring often.
• Stir in the vinegar, lemon juice, caraway, ginger, allspice, cloves and cinnamon, then cover and reduce the heat to low. Simmer, stirring occasionally, 30 minutes. Season to taste with salt and pepper.

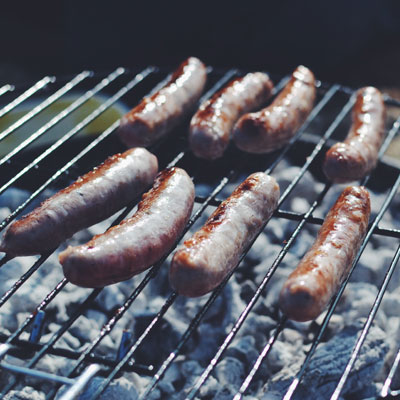
Italian Sausage
20 6-inch links
1 5-lb. boneless, skinless pork shoulder, cut into 1- to 2-inch pieces
10-ft. hog casings*
¼ cup dried oregano
¼ cup fennel seeds
3 Tbsp. kosher salt
2 Tbsp. dried basil
2 Tbsp. sugar
1 Tbsp. freshly ground black pepper
1 tsp. cayenne pepper
1 tsp. red pepper flakes, plus more to taste
2 Tbsp. grated garlic
3 Tbsp. dry red wine
Special equipment: a sausage stuffer stand mixer attachment, a meat grinder attachment with ¼-inch die and a sausage pricker (optional)
• Freeze all grinder parts, including the die, until very cold, about 1 hour. Refrigerate a large stainless-steel bowl until cold.
• Line 2 baking sheets with plastic wrap. Place the pork in single layers on the baking sheets, cover with more plastic wrap and freeze until the meat is very firm but not frozen, about 1 hour.
• Meanwhile, soak the hog casings in lukewarm water at least 30 minutes. Rinse and set aside.
• In a small bowl, combine the oregano, fennel seeds, salt, basil, sugar, black pepper, cayenne and red pepper flakes; set aside.
• Remove 1 baking sheet of pork. With the mixer on high speed, grind the pork 3 to 4 pieces at a time, collecting the ground meat in the chilled bowl. Repeat with the remaining sheet of pork.
• Add the garlic to the ground meat and use your hands to gently mix and distribute the garlic, about 20 seconds. Sprinkle the reserved spice mixture evenly over the pork and knead, rotating the bowl, until the spice mixture is evenly distributed and a light film has formed on the bowl, about 1 minute.
• Add the wine and knead until the mixture holds together and is very stiff (it will spring back when pressed), about 1 minute. Form ¼ cup mixture into a 3-inch patty, press it onto your palm, then flip your hand over. If it sticks at least 5 seconds, it’s ready. If not, continue to knead in 15-second intervals, trying again until it does. Don’t over mix, or the sausage will be crumbly.
• Remove the meat grinder attachment and replace with the sausage stuffer attachment. Slide the casing onto the nozzle, leaving 6 inches hanging loose from the end.
• Working with a partner, pack a handful of meat into the top of the stuffer. With the mixer on high speed, use the plunger to push the meat through, firmly filling the casing and sliding the filled sausage onto a baking sheet. As the casing fills, lightly prick any air bubbles with a sausage pricker or pin. Stop filling when 6 inches of empty casing remains.
• Tie off the starting end of the casing, knotting it flush with the meat. Measure 6 inches from the knot and pinch. Twist the link toward you 2 rotations. Repeat and twist 2 times in the opposite direction. Continue measuring and alternating the direction of the twists until you can no longer make another sausage. Squeeze out the extra meat and tie off the casing. Use scissors to cut the sausages at the twists into links.
• Prick each sausage link in 3 places with the sausage pricker or pin to prevent bursting during cooking. Arrange the links on a parchment-lined baking sheet and refrigerate, uncovered, to dry casings, at least 12 hours.
• Sausages will keep refrigerated in an airtight container 3 to 4 days or frozen up to 6 months.
* Hog casings are available at The Block Restaurant and Butcher and Wenneman Meat Co. Call ahead to confirm availability.
Bratwurst
20 6-inch links
3 lbs. skinless, boneless pork shoulder, cut into 1- to 2-inch pieces
1 lb. skinless, boneless lean veal shoulder, cut into 1- to 2-inch pieces
1 lb. pork back fat*
3 Tbsp. kosher salt
2 tsp. ground white pepper
1½ tsp. ground ginger
1½ tsp. nutmeg
10-ft. hog casings*
2 large eggs, lightly beaten and chilled
1 cup very cold heavy cream
Special equipment: a sausage stuffer stand mixer attachment, a meat grinder attachment with ¼-inch die and a sausage pricker (optional)
• Freeze all grinder parts, including the die, until very cold, about 1 hour. Refrigerate a large stainless-steel bowl until cold.
• Line 2 baking sheets with plastic wrap. In a very large mixing bowl, combine the pork, veal, pork back fat, salt, pepper, ginger and nutmeg. Place the meat in single layers on the baking sheets, cover with more plastic wrap and freeze until the meat is very firm but not frozen, about 1 hour.
• Meanwhile, soak the casings in lukewarm water at least 30 minutes. Rinse and set aside.
• With the mixer on high speed, grind the meat 3 to 4 pieces at a time, collecting the ground meat in a chilled bowl. Freeze until very cold, 15 to 30 minutes.
• Using a wooden spoon, mix the ground meat 1 minute. Add the cream and eggs and continue to mix until the liquid is incorporated and the mixture is sticky, about 2 minutes.
• Remove the meat grinder attachment and replace with the sausage stuffer attachment. Slide the casing onto the nozzle, leaving 6 inches hanging loose from the end.
• Working with a partner, pack a handful of meat into the top of the stuffer. With the mixer on high speed, use the plunger to push the meat through, firmly filling the casing and sliding the filled sausage onto a baking sheet. As the casing fills, lightly prick any air bubbles with a sausage pricker or pin. Stop filling when 6 inches of empty casing remains.
• Tie off the starting end of the casing, knotting it flush with the meat. Measure 6 inches from the knot and pinch. Twist the link toward you 2 rotations. Repeat and twist 2 times in the opposite direction. Continue measuring and alternating the direction of the twists until you can no longer make another sausage. Squeeze out the extra meat and tie off the casing. Use scissors to cut the sausages at the twists into links.
• Prick each sausage link in 3 places with the sausage pricker or pin to prevent bursting during cooking. Arrange the links on a parchment-lined baking sheet and refrigerate, uncovered, to dry casings, at least 12 hours.
• Sausages will keep refrigerated in an airtight container 3 to 4 days or frozen up to 6 months.
* Hog casings and pork back fat are available at The Block Restaurant and Butcher and Wenneman Meat Co. Call ahead to confirm availability.
Related Recipes


Most Recent
Mexican restaurant The Salted Lime now open at Ameristar Casino in St. Charles
Ameristar Casino Resort Spa St. Charles at 1 Ameristar Blvd. has a new …